[citationic]
As with many of my articles, this one serves as a public “note to self” for a problem that I run into often enough to need to skip a lot of searching but not often enough to remember how to fix. I have set up a new Ubuntu server system and I want to manipulate files from my desktop using WinSCP. This works almost automatically if you enter your password each time or you don’t work with files that require sudo permissions. Of course, I want both. I guess you came here for the same reason. Follow the steps in this article to configure Ubuntu for public key WinSCP access. Because WinSCP uses PuTTY-formatted key files, I added a section on configuring PuTTY for public key access as well.
Prerequisites
You will need two pieces of software on your Windows system.
The Linux system(s) that you connect to must have a running OpenSSH server. Ubuntu Server can optionally prepare it during system installation. If you did not select that option, follow the official directions to enable OpenSSH server on Ubuntu. Search the Internet for relevant instructions if you use a different distribution.
To get the most out of this article, the account that you connect with must belong to sudoers on the remote host. If you have a standard account, you can still follow the steps here for private key login, but skip the part about password-less sudo login.
The instructions show you how to create a public-private key pair. The how-to matters less than the “where”. You need to decide that part. That decision has two parts: which system, and where on that system.
What System Should Create a Private Key?
The key pair that you create belongs to you, not to any particular system. You can create it on a target system. However, the general idea behind user-identifying private keys is to use them only from a client system. In other words, the design intent expects you to generate a key pair on your client computer and send the public key to remote systems so they know that it belongs to you. Ideally, the private key never exists in more than one location. Preferably, you will not use a private key on a client system to connect to a remote system that uses the same private key. You can always change this later by generating new key pairs and deleting the old or just moving the key files as necessary. Try to start off the “right” way.
Where Should a Private Key Reside?
The Linux-based tools will automatically create a hidden .ssh subdirectory under your profile (ex: /user/home/eric/.ssh). You and anything running under your user account can read the private key. A sudoer could change permissions and ownership, but otherwise no one else has access.
Windows has its own key management system that behaves remarkably different from Linux, so we have to improvise a bit. By “improvise”, I essentially mean, manually do the same thing on Windows that Linux tools do automatically. If you want to “Linuxify” your Windows system, then you can create a .ssh folder under your profile (ex: C:\Users\Eric\.ssh). Browsing to the root of the profile is more of a pain to me than it’s worth, so I create a “Keyring” folder under the “My Documents” folder (ex: C:\Users\Eric\Documents\Keyring). I don’t usually do anything special with the file permissions since no one else even has a login for my system. Just remember the risks of a readable private key.
Step 1: Generate Your Key Pair
If you will only use this key pair from PuTTY and WinSCP, then create the pair from PuTTYgen on your client machine (instructions follow in 1B). In my case, I sometimes connect from a Windows Subsystem for Linux (WSL) instance, so I generated the key there and then used PuTTYgen to convert it to a key for PuTTY and WinSCP (instructions in 1A).
Step 1A Part 1: Generate a Key Pair in Linux for PuTTY and WinSCP
Log in to the console of your client Linux system with the user account that you will use as a client. Do not switch to sudo context or use sudo. Run:
ssh-keygen -t rsa
The tool will prompt for where to create the key pair and what to call it, defaulting to a .ssh subdirectory of your profile with a file name of id_rsa. Press [Enter] without typing anything to accept this, or override as you wish.

If the directory does not exist, the tool will create it automatically.
Next, it will ask you for a passphrase. If you provide one, then you will need to enter it every single time you use the key. This makes it more secure as no automated tool can use the key without that passphrase and if someone steals your key file then they’ll need to know it. However, if I wanted password protection, then I would just continue using password prompts without going to all the trouble to create and set up key authentication. So, first, understand the risks. Then, press [Enter] twice to create a private key without a passphrase.
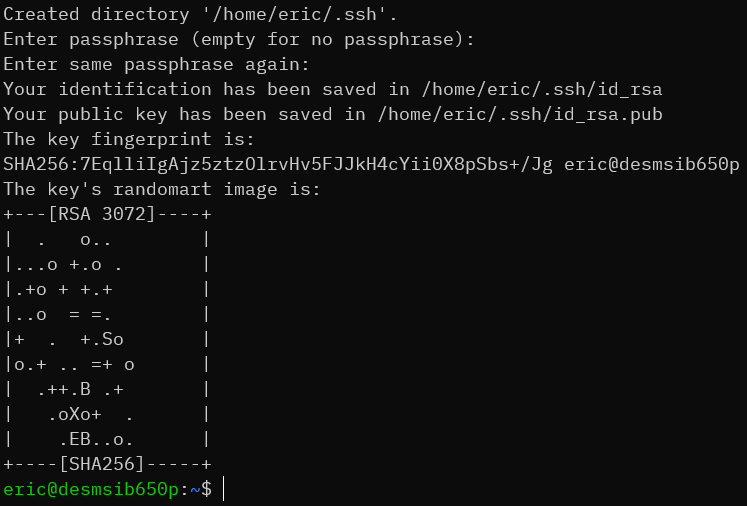
The tool will output the key’s SHA256 fingerprint and randomart. You can save the fingerprint somewhere if you like, although on the odd chance that you might ever need it, you can use ssh-keygen to retrieve it:
ssh-keygen -lf ~/.ssh/id_rsa
On the exceptionally odd chance that you might need to see the randomart again:
ssh-keygen -lvf ~/.ssh/id_rsa
Note: the purpose of randomart is to give humans a way to visually compare keys. This knowledge has never served me as anything other than trivia. I assume some tool out there gives you the option to verify keys this way, but I have never encountered it.
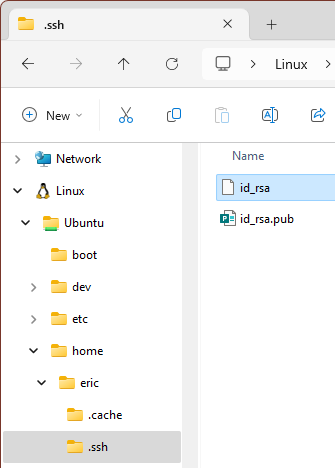
At this point, your Linux system has created an id_rsa file (unless you overrode it) that contains your private key. Take very good care of that file. No one other than you should even have read access. The tool also created a matching id_rsa.pub file that contains the public key that matches the private key. You can freely distribute that file. For this article, we will place it on systems that we want to remote into.
Step 1A Part 2: Convert an OpenSSH Key for PuTTY and WinSCP
First, you need to transfer the key files from the system in part 1 to your Windows machine. Since I created mine in WSL, I could do this in a drag-drop operation:
If you connected in with plain password-protected WinSCP, you can copy the private key that way. If you used a plain password-protected PuTTY session, then you can display the contents of the private key file on screen, highlight it, and copy it to the clipboard. Paste into a file on your Windows system. You can use any text editor on the Linux system that you like, such as nano, or output it directly to the console with:
tail ~/.ssh/id_rsa
As always, take caution with the contents of a private key file.
You do not necessarily need to copy over the public key file, as PuTTYgen can recreate the necessary parts of it on demand. However, it doesn’t hurt anything to have it, and it might make something easier in the future to get it now.
Launch the PuTTYgen program. Click the Load button at the right of Load an existing private key file. Browse to the location where you saved the file from the Linux system. You will need to change the file filter from from *.ppk to *.*.
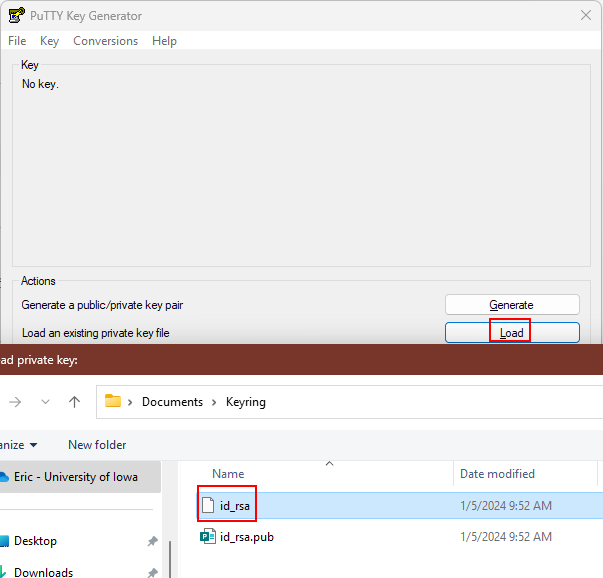
After importing the file, PuTTYgen will show the public key information. If you open the id_rsa.pub file in a text editor, then you will see the same content.
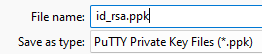
Do not change any of the options. Click the Save private key button. It will double check that you want to save the key without a passphrase, then give you the standard save dialog box. You can name it anything that you like, although I typically continue with the ida_rsa trend and attach the ppk extension. PuTTYgen will not automatically use that extension, so you need to provide the complete file name.
You now have a .ppk file for PuTTY and WinSCP. Continue on to step 2.
Step 1B: Generate a Key Pair in PuTTYgen
Launch the PuTTYgen program. Leave the default options. Click the Generate button to the right of Generate a public/private key pair.
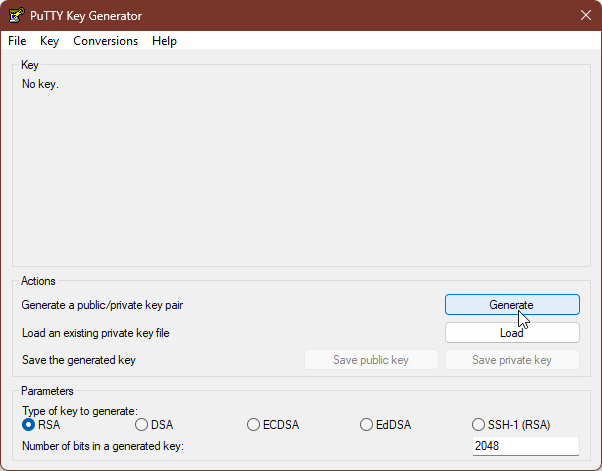
A progress bar will start, along with a request for you to move the mouse over the empty area of the window to provide input that it will use to introduce “randomness” into the generation procedure.
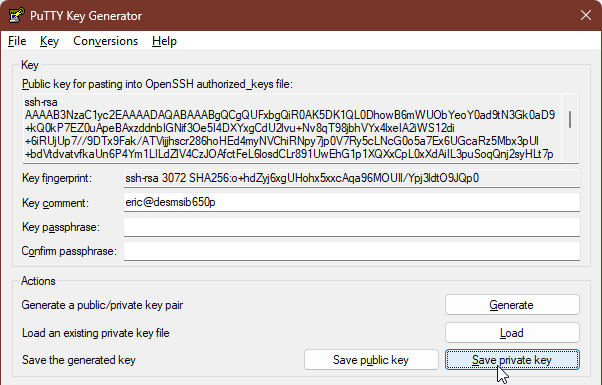
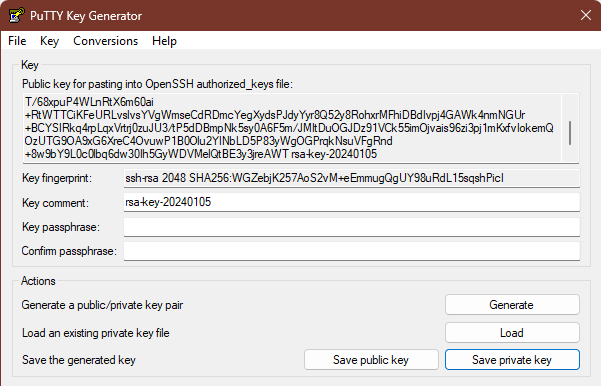
Once the process completes, it will show the public key portion that you supply to remote systems. You will need this later. You can save it to a file manually or with the Save public key button.
Note the contents of the Key comment field. You can leave this as-is or change it to anything that you like. However, the Linux tools generally use username@sourcesystem so that you can easily identify it once supplied to remote systems. See the screenshot from the preceding section for an example of how this appears in a key generated on Linux.
Do not change any of the options. Click the Save private key button. It will double check that you want to save the key without a passphrase, then give you the standard save dialog box. You can name it anything that you like, although I typically continue with the ida_rsa trend and attach the ppk extension. PuTTYgen will not automatically use that extension, so you need to provide the complete file name.
Optionally, click the Save public key button. The name most commonly used for these files is id_rsa.pub. Even if you don’t save the public key to disk, you will need the data from the portion of the dialog that says Public key for pasting into OpenSSH authorized_keys file. At least have it available to copy/paste.
You now have a .ppk file for PuTTY and WinSCP. Continue on to step 2.
Step 2: Configure Ubuntu to Accept your Private Key
With the private key created and placed on your client system, you need to let the target(s) know about it so they accept it for login. For this step, you will need the public key portion from whatever path you took in step 1. From 1A, this is the contents of the id_rsa.pub file. In either version, this was shown by PuTTYgen in the text box marked Public key for pasting into OpenSSH authorized_keys file.
The goal of this section: add the contents of your public key to the ~/.ssh/authorized_keys file on the target system. The big trick: don’t introduce a Windows-style line ending to that file. You have several ways to do this.
Option 1: Transfer and Append the Public Key File
This option requires the most effort but will work every time, especially if you started with a public key file generated from within Linux. First, use WinSCP or sftp or whatever you want to transfer the id_rsa.pub or equivalent file to your user’s home folder on the target system. Then, run the following steps, skipping any of the item creation or permission changes that you don’t need:
cd ~
mkdir .ssh
chmod 700 .ssh
touch .ssh/authorized_keys
chmod 600 .ssh/authorized_keys
cat id_rsa.pub >> .ssh/authorized_keys
Note 1: The .ssh directory might already exist and contain a file named id_rsa.pub. Since you copied in a public key from another system, this should be a different file. Take care that you use the correct source file with the cat command.
Note 2: The .ssh directory or the authorized_keys file might already exist. The above commands won’t hurt them, but the system will warn you. The only necessary part of this is the cat command that appends the public key into the authorized keys file. If the directory and file were created by automated tools, they will have set the necessary permissions.
The remote system will now accept your key. Move on to step 3 to enable password-less sudo logon for WinSCP and PuTTY.
Option 2: Copy/Paste Via Remote Session
If using PuTTY or a similar tool that allows copy/paste of text, you can use this option. Make sure that you have the contents of the public key on your clipboard.
Connect to the target Linux system and run the following:
cd ~
mkdir .ssh
chmod 700 .ssh
touch .ssh/authorized_keys
chmod 600 .ssh/authorized_keys
nano .ssh/authorized_keys
These instructions open the authorized keys file in the nano editor, which Ubuntu installs by default. Feel free to use VIM or whatever tool you like. Paste the contents of the clipboard as the very last line in this file. You do not want to paste in any end-line character sequence from Windows. If the text editor moves to the next line after pasting, use the backspace to remove it. Press [CTRL]+[O] (letter O) to save the file and [CTRL]+[X] to exit.
You can also paste without a text editor. With the information on your keyboard, follow the above up to but not including the nano line. Instead:
echo PASTED-CLIPBOARD-CONTENTS >> .ssh/authorized_keys
If your clipboard contains a line-end character, then it will echo to the screen. You can backspace it out before completing and submitting the command line.
The remote system will now accept your key. Move on to step 3 to enable password-less sudo logon for WinSCP and PuTTY.
Option 3: Use ssh-copy-id
Not surprisingly, the Linux tools solved this problem a long time ago. Unfortunately, it needs the Linux tools. So, this will work just fine from your WSL session but not so much if you only have a Windows client. I have not personally tested any of the ported tools, but they might work.
In your source system that contains the key pair that you generated in 1A, run:
ssh-copy-id TARGETSYSTEM
Assuming that this system has not connected to the specified remote before, it will ask you to approve the remote host’s key. Type yes and press [Enter]. Next, the remote host will prompt you for your password. Once you supply that, it will perform everything necessary to enter your public key into the remote host’s authorized_keys file.
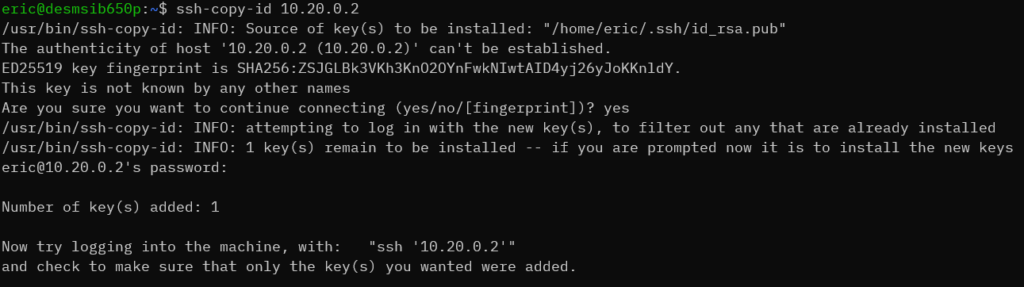
Note that it uses the same user name on both ends.
The remote system will now accept your key. Move on to step 3 to enable password-less sudo logon for WinSCP and PuTTY.
Step 3: Enable Password-less sudo Logon
At this point, you have done enough for typical console access (including PuTTY) using a private key. Also, if you don’t need to use WinSCP to manipulate files that require sudo permissions on the remote host, then you can also work with this step. However, this step fulfills the point of the article: give you access to secure files on a remote Linux host using WinSCP. Unlike you using an interactive console, WinSCP can’t switch to a sudo context after connecting. By default, nothing can connect directly to an elevated session. If you have encountered the message “Error skipping startup message. Your shell is probably incompatible with the application (BASH is recommended),” then you have come to the right place. This step shows you how to change that.
At the console of the target Linux host, run the following:
sudo visudo /etc/sudoers.d/nopasswd
On my systems, visudo invokes a protected instance of nano. Traditionally, it uses the VIM editor, which I still cannot use after all these years. I will continue writing this section as though you also have nano. If your system brought up a different editor, you’ll have to search how to enter text and save the file.
Paste the following into the file, replacing my user name with yours:
eric ALL=NOPASSWD:ALL
Optionally, but not recommended, you can use %sudo instead of a user name, then any sudo-enabled account (including root), can elevate remotely without using a password. Think really hard about this, and then don’t do it.
Use [CTRL]+[O] (letter O) to save the file, then use [CTRL]+[X] to exit. Since you invoked with visudo, it should panic if you did anything wrong.
Now you can configure PuTTY, WinSCP, and other tools to connect remotely.
Step 4: Configure WinSCP to Login with a Private Key
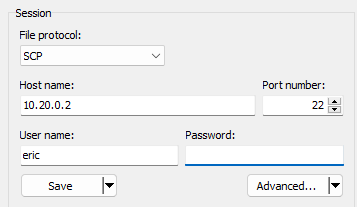
In WinSCP, set up a new site or edit an existing one for the target host. Use SCP as the protocol. Provide the host and the user name:
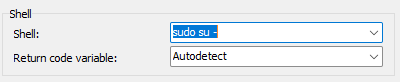
Click Advanced… and switch to the Environment > SCP/Shell tab. Change the Shell selection to sudo su –.
Still in the Advanced Site Settings dialog, switch to the SSH > Authentication tab. Click the triple-dot button at the end of the Private key file text box and browse to the private key file that you got from PuTTYgen in step 1.
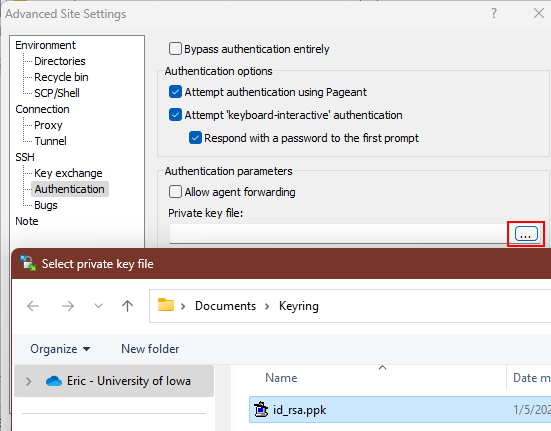
After selecting the file back into the dialog, click OK to return to the site connect dialog. Remember to Save before connecting!
Now you should be able to log in to the site and function with your account’s sudo powers.
Bonus: Configure PuTTY to use a Private Key
I wrote this article about WinSCP, but since you have PuTTY, might as well get the most out of it.
In PuTTY, start fresh or load an existing site. Fill out the remote host’s connection information (name, IP, and so forth) and set any other options that you like.
Switch to the Connection > Data tab. Enter your user name in the Auto-login username field. Since we’re here, I also like to change the Terminal-type string to linux, although I’m, not sure that it does anything anymore.
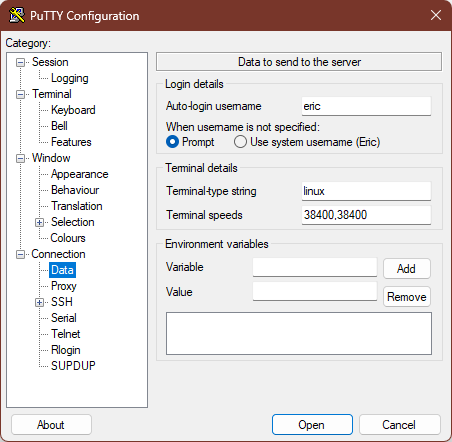
Switch to the Connection > SSH > Auth > Credentials tab. Use the Browse… button next to the Private key file for authentication text box to navigate to and select the private key file that PuTTYgen created for you in step 1.
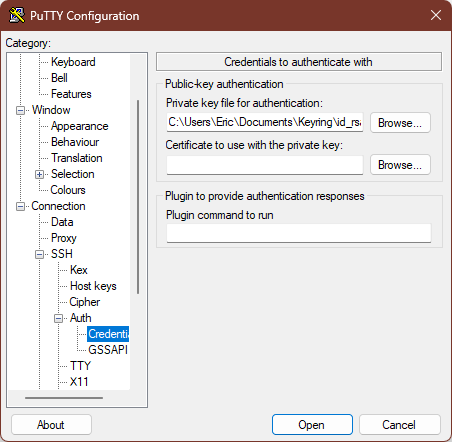
Remember to switch back to the Session tab and Save your options before clicking Open, or you’ll have to do all this again!
From now on, you can just load and open this site without seeing a password prompt.

Remember that you do not need to follow step 3 to make this work, as PuTTY will always connect to a non-privileged session. However, if you do follow that step, then you will see fewer password prompts when you elevate. For instance, sudo -s will immediately switch to a privileged context.