Whether setting up a lab or deploying into production, server administrators need to gain comfort with the installation process for Windows Server. This article specifically shows how to install Windows Server 2022. The process has not had much more than cosmetic changes for about a decade. These directions start at the beginning and go through fundamental post-install steps.
[citationic]
How to Acquire Windows Server 2022
You can get Windows Server 2022 from these sources:
- Microsoft’s Evaluation Center
- The Microsoft licensing site and login assigned for your organization
- Your OEM
- A retailer
The steps typically do not change based on the media that you use. Some may not allow you to proceed without entering a product key. OEMs may inject screens or customize text. For reference, this article uses the evaluation source.
Choices for Windows Server 2022 Installation Media
Most of us will acquire Windows Server media in a digital format. You can choose between ISO and VHD formats. With the ISO, you can burn to a physical DVD or use a virtual mounting technique from which you can run the Windows Server installer. You can connect the VHD format to a virtual machine running under Hyper-V or any other virtualization technology that can operate VHDs.
Modern computer systems can boot from USB thumb drives, provided that they contain a bootable operating system image. Several tools exist to make the leap from ISO to bootable USB media, such as Rufus and Balena Etcher.
If upgrading an existing Windows Server deployment, you can mount the ISO in that environment just by double-clicking it. You can usually install from the mounting image, but I recommend copying the files out to a local folder. The mount doesn’t automatically restore after a reboot, but extracted files remain.
Choices for Windows Server 2022 Installation Mode
As you proceed through the installer, it will ask you to choose from a base server installation or server “with desktop experience”. Your choice depends on your intent of usage.
An installation without the desktop experience, commonly known as “Server Core”, works best for “headless” deployments. In this scenario, administrators rarely or never log directly onto the console of the server. It cannot run any software that depends on Explorer’s rendering engine. Additionally, take caution with third party software. Most things work perfectly well in a core environment, but software vendors may refuse to support their products in anything other than the desktop experience.
Without the Explorer engine, entire classes of malware fail to function. However, this has lost value over the years. When Windows Server’s Core mode debuted, we saw many claims of lower resource utilization. Whether true then or not, it does not apply now for typical server uses. In all cases, the server operating system and running applications will consume the resources that they need. That means that a logged on session with the desktop experience loads up everything that it needs to display a desktop and applications. However, a server with all sessions logged off needs no display resources. So, resource consumption on a logged off server in Core mode looks exactly like resource consumption on a logged off server with the desktop experience.
Make practicality your major decision guide. Core mode will force usage of the command line and PowerShell. You can carry out the same tasks with the desktop experience. You can operate a wider range of software. However, even though risks have somewhat equalized, the Explorer engine still provides a greater attack surface for malicious actors. Ultimately, your ability to carry out your responsibilities matters most.
Choices for Windows Server 2022 Edition
As it has for the past several versions, Windows Server ships in two different editions: Standard and Datacenter. Datacenter adds features for software-defined storage and networking. To use them effectively, you need to form at least one cluster of multiple physical hosts to operate your infrastructure. Feature-wise, if you don’t already know that you need Datacenter edition, then you probably don’t.
The licenses that you purchase for the editions also differ in “virtualization rights”. Microsoft sells these licenses in packs that cover one pair of physical CPU cores over two separate sockets. Each time that you purchase sufficient Standard Edition licenses to fully cover the cores in a host, you gain two additional virtualization rights for Windows Server. You can “stack” these indefinitely. Each of these virtualization rights allow for an additional virtualized instance of Windows Server Standard Edition.
If you instead purchase Datacenter Edition, then you only need to sufficiently license the host one time and you gain rights for an unlimited number of Windows Server instances, either Standard or Dataceenter. Datacenter Edition has little value over Standard inside a virtual machine, so you typically choose between the two depending on the features that you need on the physical system or the number of virtualized Windows Server instances that you intend to operate on it.
Remember that the virtualization rights belong to the license that you buy and have nothing to do with the operating system that you install on the physical system, even if you use a non-Microsoft hypervisor. The virtualization rights also only apply to Windows Server guest instances, not desktop Windows or any non-Microsoft operating system. They also do not dictate the number of virtual machines that you can create: they apply only to running instances of Windows Server.
Microsoft has introduced new licensing options in conjunction with Azure subscriptions.
In all cases, treat what you read about licensing here or on any publicly available resource as a starting point. Mistakes with licensing constitute a legal matter that exposes your organization to serious fines. If you buy your licenses from a major reseller, they will have professionals on staff trained in this. Typically, sales teams can get you in contact. Talk with them before doing anything on your own.
A Walkthrough of Windows Server 2022 Installation
This part of the instruction set walks through installing an evaluation copy of Windows Server 2022 from ISO. The VHD-based instructions start in the next section.
If you start from different source media, you may see different screens that deal with licensing. The installers use the same functional screens.
These instructions start after booting to the installation media.
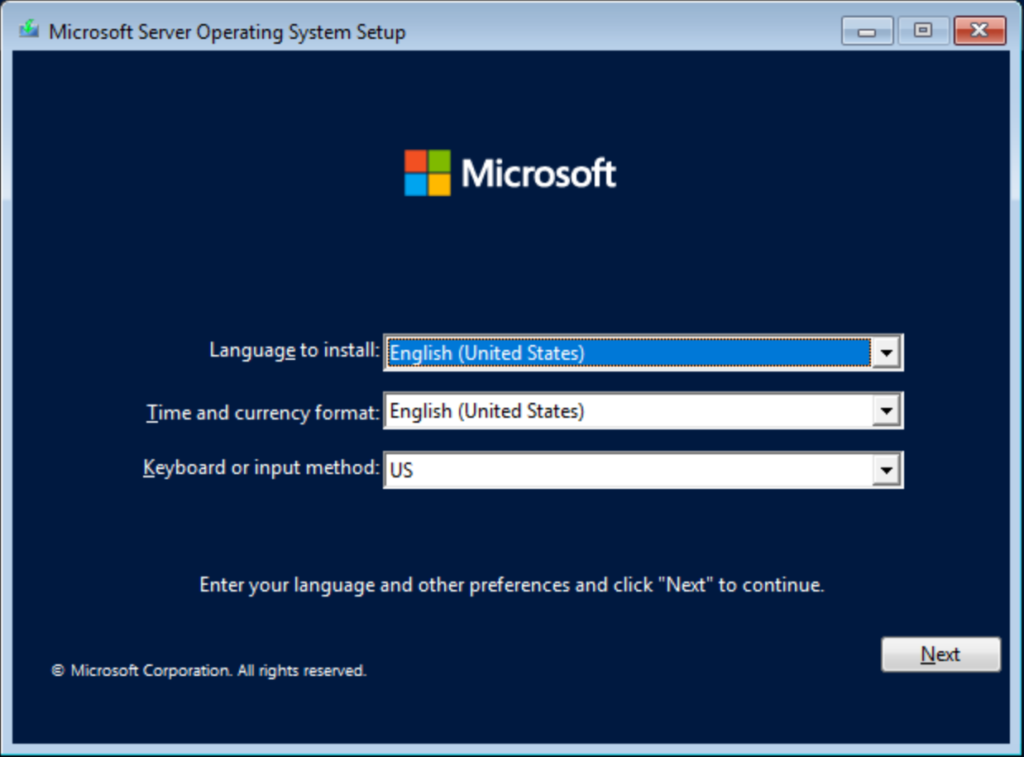
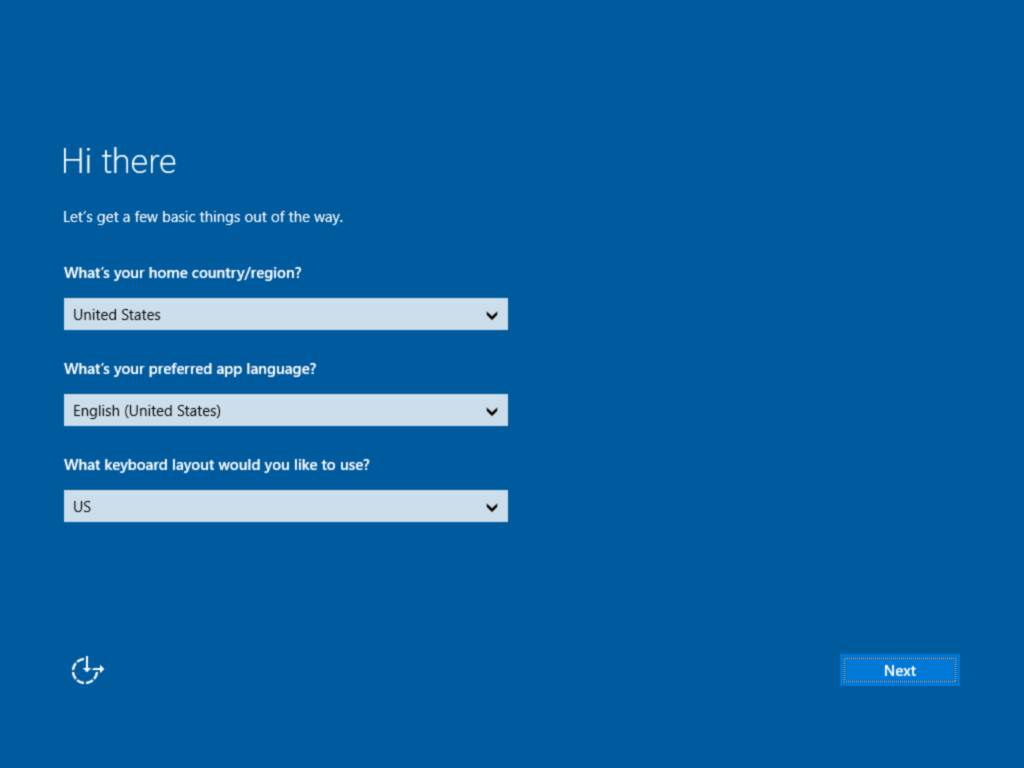
The first screen you see will ask for your language, time/currency format choice, and your input. The defaults and choices depend on the language of your install media. Make the appropriate changes and click Next.
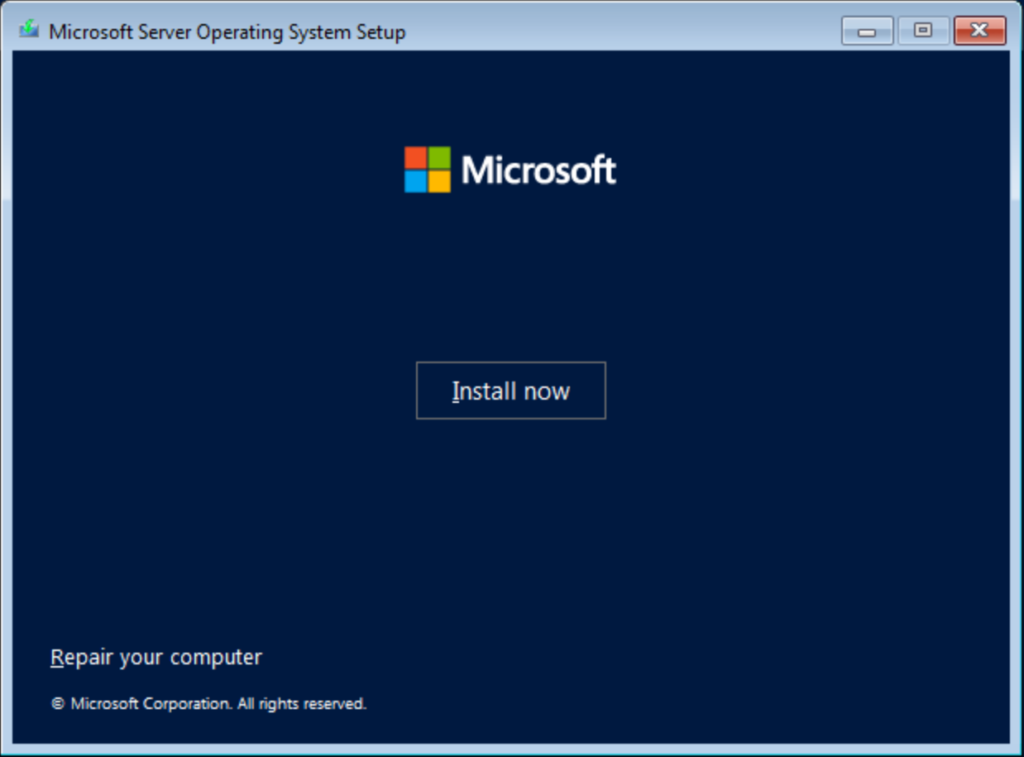
The second screen only presents two paths: Install Now or Repair your computer. You would choose repair to fix an existing but broken installation of Windows Server. For these instructions, click Install Now.
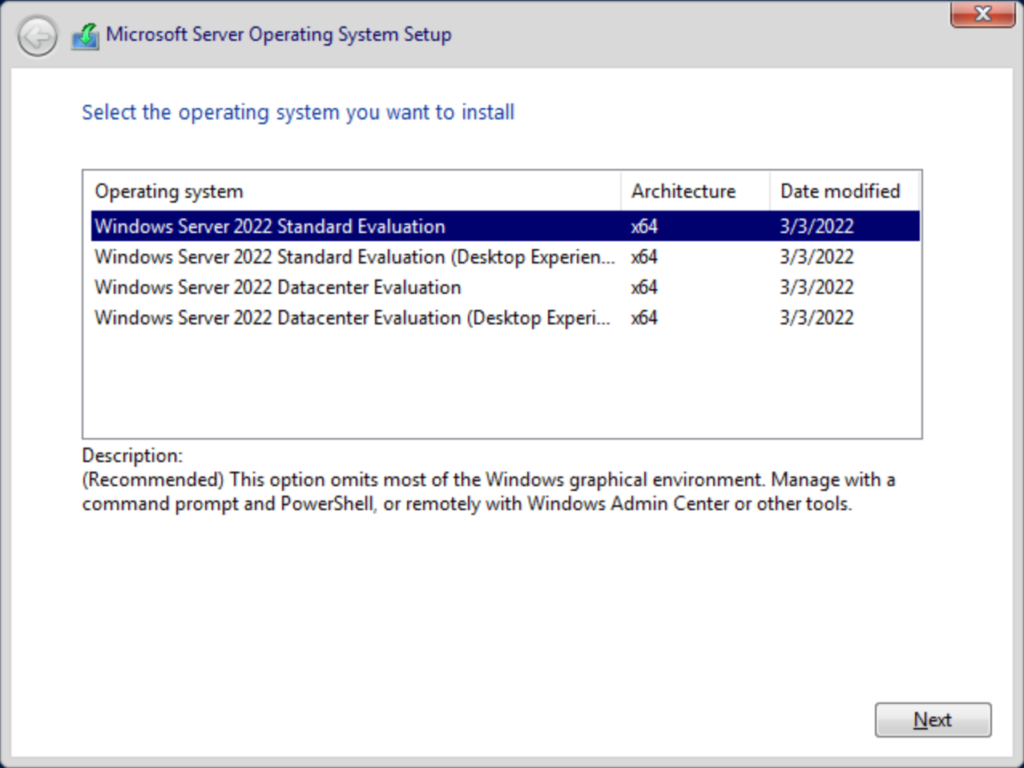
Setup will take a few moments to prepare, then show you the installation options contained on the media. Evaluation media allows you to choose Standard or Datacenter Edition with or without the desktop experience. The post-install setup instructions in this article will work for any choice that you make.
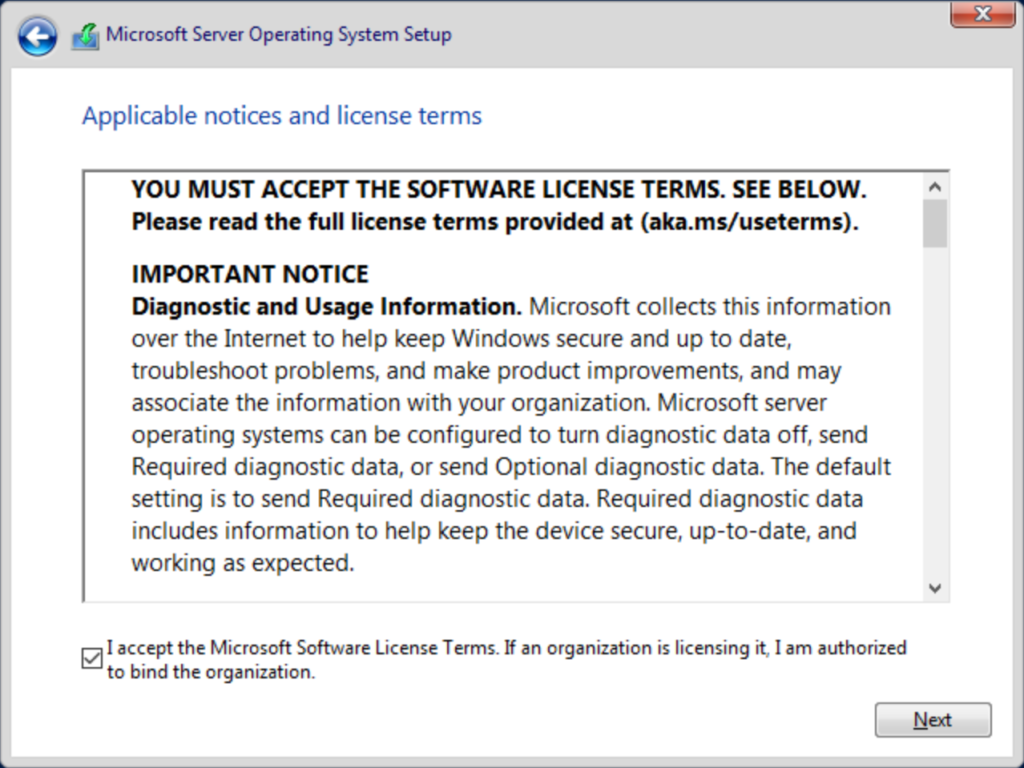
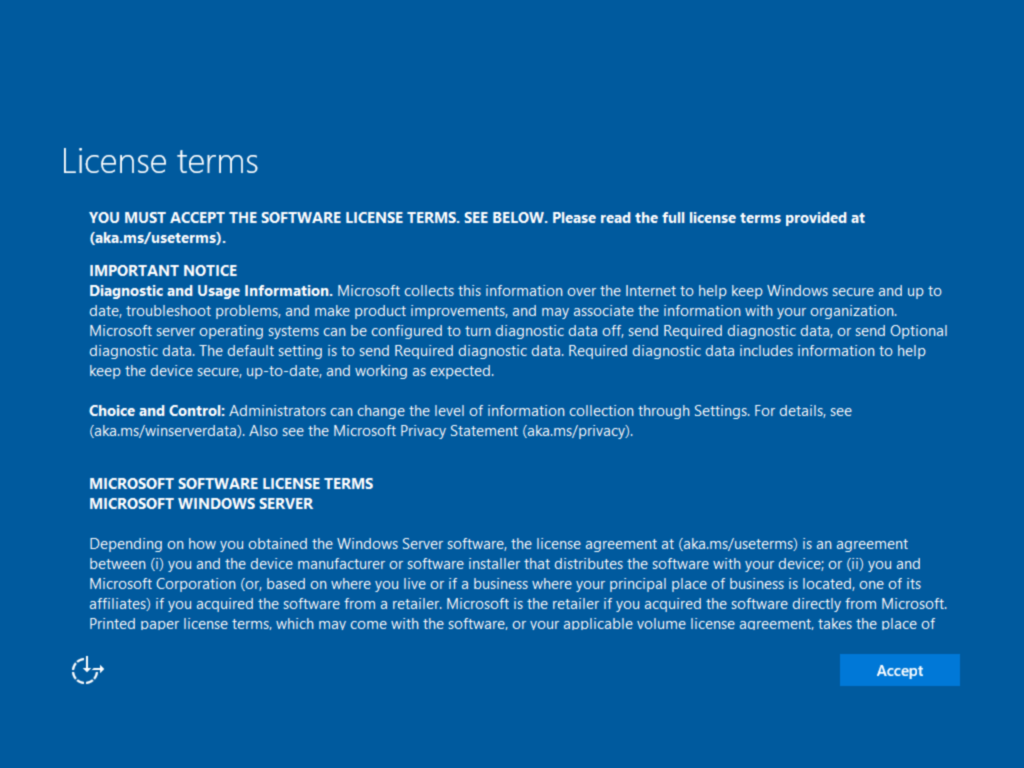
Next, you’ll need to accept the license agreement. What you see will depend on your media. Check the acceptance box and click Next.
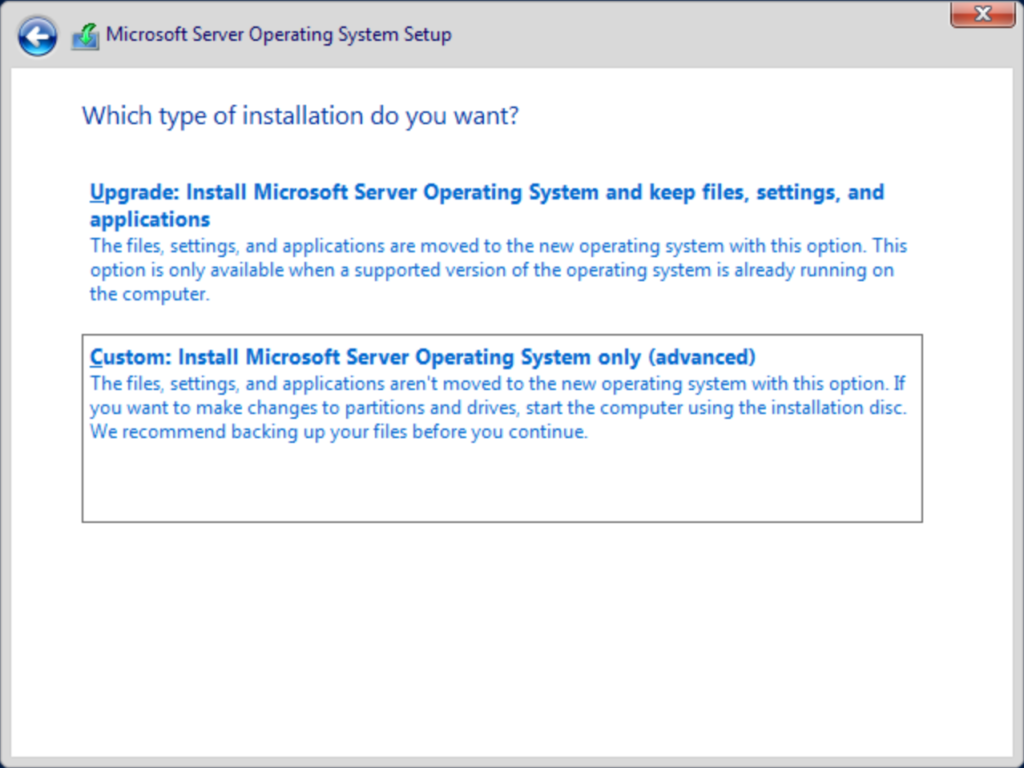
Now you need to tell the installer your choice between a new install or an upgrade. An upgrade installation requires an existing Windows Server install. These instructions cover a new install, so choose the Custom line.
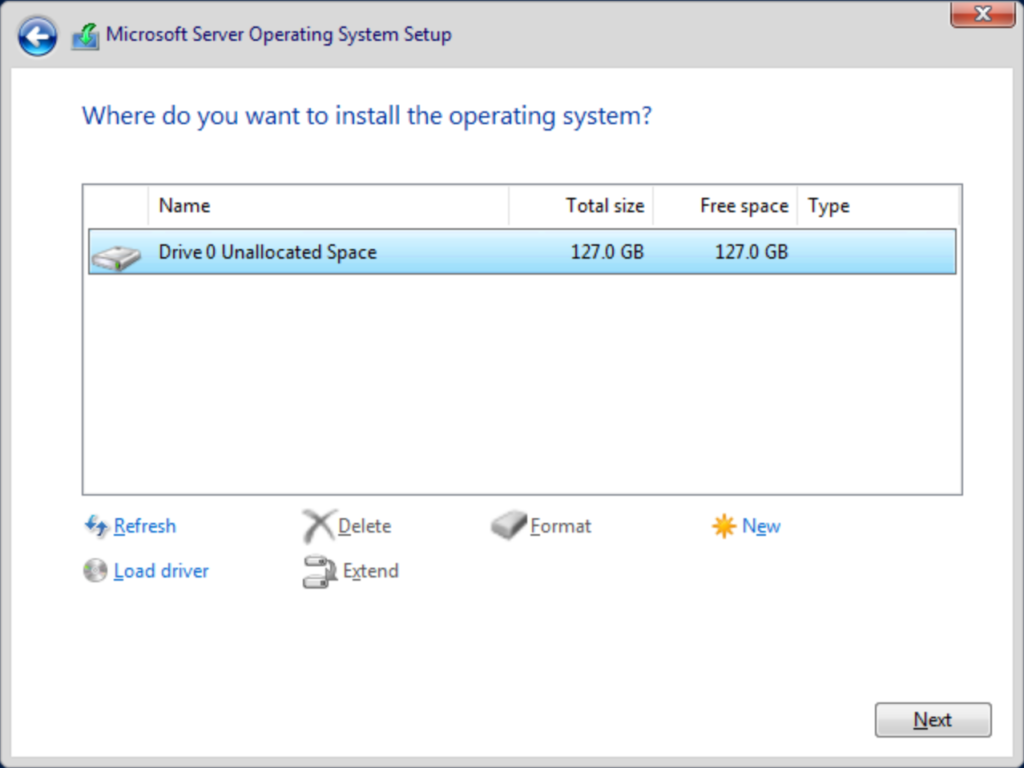
Next you need to choose placement for the operating system. The installer will show all detected locations and should immediately work with all modern hardware. If it does not present what you expect, you can use the Load driver link if you have install files. Your hardware manufacturer should provide the files and instructions. You can also use the other links if you need to clear out old partitions. The installer will automatically format the install location. You can manually instruct it to format other locations. Once you’ve finished arranging your partitions, highlight the one where you want to place Windows Server and click Next. If you do not choose the first space on a disk, then the installer will place a small amount of boot files there.
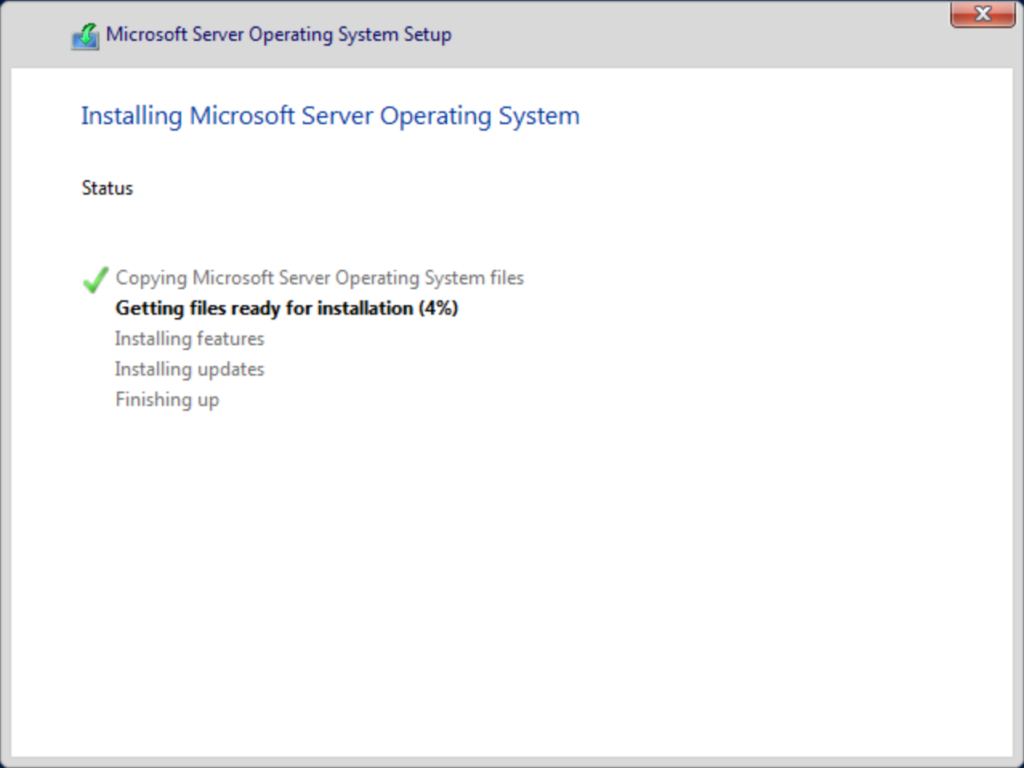
Now, you just need to wait. The installer will perform formatting and file placement. Expect at least one automatic reboot.
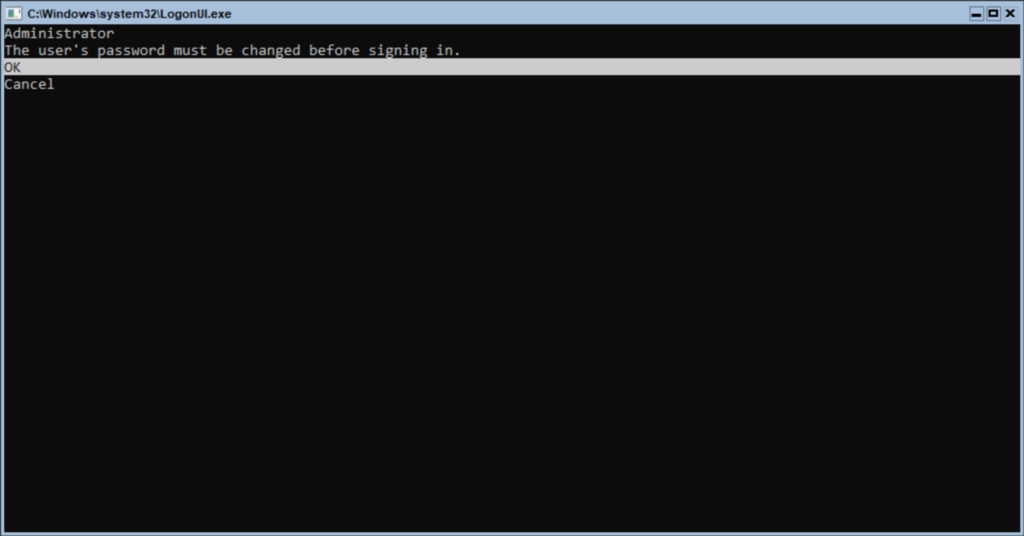
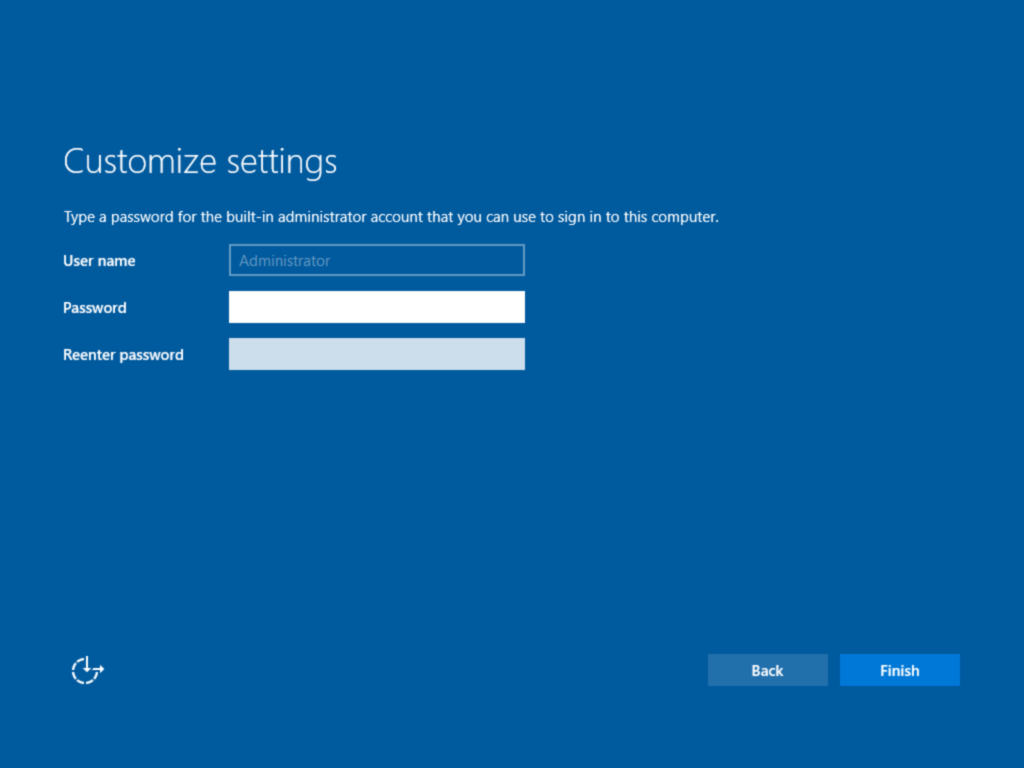
Once the installation completes, you will need to set the local Administrator password to proceed. This part of the instructions followed a core mode install, so the screenshot shows a text-based prompt. A desktop experience installation will have the same prompt, but in graphical format. The next section for the graphical mode starts after the next screenshot. Follow the prompts to set the password.
Congratulations! You have completed the installation process.
Windows Server 2022 Graphical and VHD Installation Walkthrough
These instructions pick up at the beginning of the VHD install process. If you install from ISO in graphical mode, follow the previous section until the password set screenshot, then continue here at the graphical password change screenshot.
The first screen after boot will have you choose your region, language, and input method. Make your selections and click Next.
Click Accept on the license screen.
Enter the starting password for the administrator account twice and click Finish.
Congratulations! This completes the VHD or graphical installation path. You can now log in with the administrator account and password that you entered.
Windows Server 2022 Post-Install Steps
After you install Windows Server, you have a few steps to follow to make it ready for use. You have several ways to accomplish this. These directions will use a tool built specifically for the job and that exists on all Windows Server SKUs: “sconfig”. On a core mode installation, sconfig starts automatically once you log in. On a graphical installation, open an elevated command prompt, type “sconfig” and press Enter.
You will see the following screen:
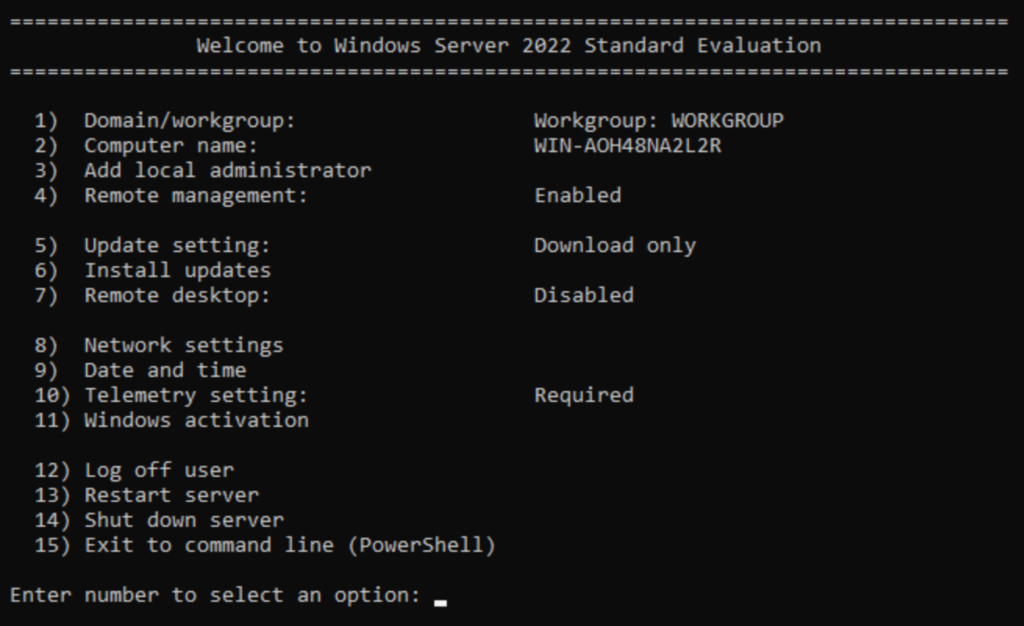
Set the Server Computer Name
Start by assigning the server a proper name. If it will belong to your production or a defined test network, then follow the appropriate naming conventions. Otherwise, name it to suit your purposes. To rename the computer from the sconfig main menu, type 2 and press Enter.
On the Computer Name screen, enter the new name and press Enter.

The interface will ask you to restart. Press Y and press Enter. After the reboot, log in and start the sconfig program again.
Configure Networking
Windows Server starts as a DHCP client by default. If you assign IPs to your servers using DHCP, then you can skip this section.
At the sconfig main menu, press 8 and Enter to switch to the networking menu. It will show all detected physical adapters.
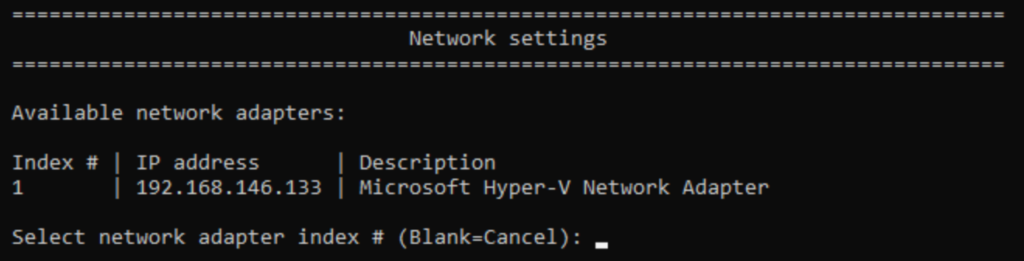
Windows Server will assigned indexes to the adapters automatically. Type the index number of the adapter that you want to configure and press Enter.
sconfig will show you the current IP information for the adapter that you chose along with a new menu that allows you to select an item to change.
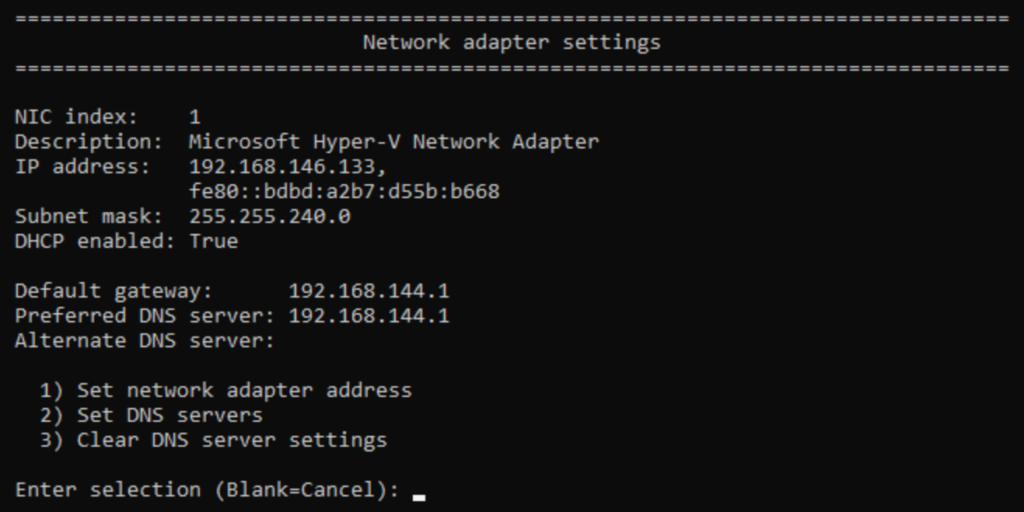
To set an IP address, type 1 and press Enter. sconfig will first ask if you want to set DHCP (which you can use to restore DHCP if you want to unset a static IP). For these instructions, type S and press Enter to set a static address.

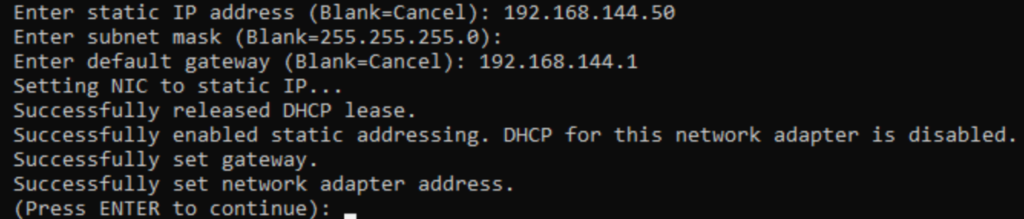
Now you can just follow the prompts to set the IP, subnet mask, and gateway. If you need to apply an IP address but no gateway, then enter 0.0.0.0 or the adapter’s own IP address when asked for a gateway. If you enter nothing, it will cancel IP assignment and sconfig might place the adapter in an uncertain state that it can’t correct.
Upon pressing Enter, you will return to the main sconfig screen. You still need to set your DNS servers, so enter 8 and the the number of the adapter again. This time, press 2 to set DNS servers. You can enter a preferred an alternative DNS server. If you simply press Enter at either point, sconfig stops assigning DNS servers there.

Once you press Enter, sconfig will return you to its main menu.
Join the Server to a Domain
Once the server can communicate on the network, it can join an Active Directory domain. From the sconfig main menu, type 1 and press Enter. sconfig will show you the Domain/Workgroup screen. To join a domain, type D and press Enter.
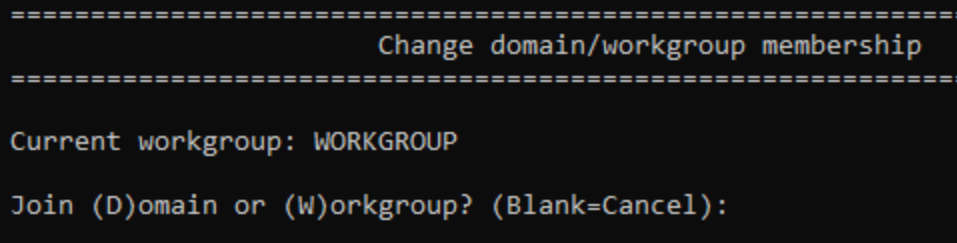
Type the domain name and press Enter.

Provide the name of a domain account with privileges to add computers and press Enter.

You will need to provide a password for that account. Upon pressing Enter, sconfig will attempt to connect to the indicated domain with the specified credentials and show you its results. Reboot as prompted or return to the main menu.
Other Post-Install Activities
Your server now belongs to your network and, if you chose to, your domain. Any automated routines that you have in place can take over from here.
However, if you have no such systems, then you can continue using sconfig to complete setup. You can:
- Install updates (with or without enabling automatic updates)
- Enable automatic updating
- Set the time, including the time zone
- Provide a license key and activate
- Enable access via remote desktop
In most cases, the order that you do these things does not matter. However, if you intend to make the server a permanent domain controller, then you need to enter the license key before promoting it. You cannot change the key afterward.
Start Exploring Windows Server 2022
You now have a fully functional Windows Server 2022 installation. Start looking around and familiarize yourself with its options and tools. If you have just started your journey with Windows Server, you have a lot ahead.